

What to Expect During a Ductless Mini-Split Cleaning Service
Why Does My Mini-Split Smell Musty When the AC is On?
Have you ever turned on your cooling system expecting a blast of refreshing air, only to be hit with an odor that resembles an old, damp basement? If you are researching what to expect during a ductless mini-split cleaning service, you are likely dealing with exactly this issue. You might also notice that the system simply is not blowing as much air as it used to. These are the classic warning signs of biological growth inside your equipment.
In our years of providing comprehensive ductless mini-split services, including expert ductless maintenance in Tacoma, our team at South Sound Ductless has seen firsthand how quickly summer humidity can compromise a system.
The root cause of this problem comes down to basic physics. When your system operates, it pulls warm air from your living space over freezing cold refrigerant coils. This temperature collision creates moisture. During July peak cooling, this condensation forms rapidly inside the unit. In our experience serving Tacoma and the surrounding communities, we consistently see how the combination of our wet Pacific Northwest climate and warm summer air turns an indoor unit into an incredibly hospitable environment for mold and mildew.
Many homeowners assume that washing the reusable mesh filters in the sink will solve the problem. While keeping those filters clean is an important maintenance step, it is only a surface-level fix. The mesh filters trap dust and pet hair, but they do not stop moisture from accumulating deeper inside the machine. When mold takes root on the internal components, a simple wipe-down will not eliminate the source of the odor. Resolving this issue requires a professional deep cleaning that physically removes the biological growth from the areas you cannot see.
The Hidden Danger Inside Your Ductless Mini-Split Wall Cassette
To understand why surface cleaning fails, you have to look at the anatomy of a ductless mini-split wall cassette. Beneath the sleek plastic exterior lies a dense network of highly engineered components. The most critical of these—and the most vulnerable to contamination—is the blower wheel. This long, cylindrical fan sits deep inside the unit, featuring hundreds of tiny, closely spaced fins that scoop the air and push it out into your room.
Because the blower wheel operates directly beneath the cold, wet evaporator coil, it is constantly exposed to moisture. Over time, microscopic dust particles bypass the filters and stick to the wet fan blades. This creates a nutrient-rich sludge that allows mold to flourish. Our technicians routinely pull blower wheels from Tacoma homes that are completely caked in this debris. As the mold and dirt build up, the space between the fan blades shrinks, and the system has to work significantly harder to push the same amount of air into the room.
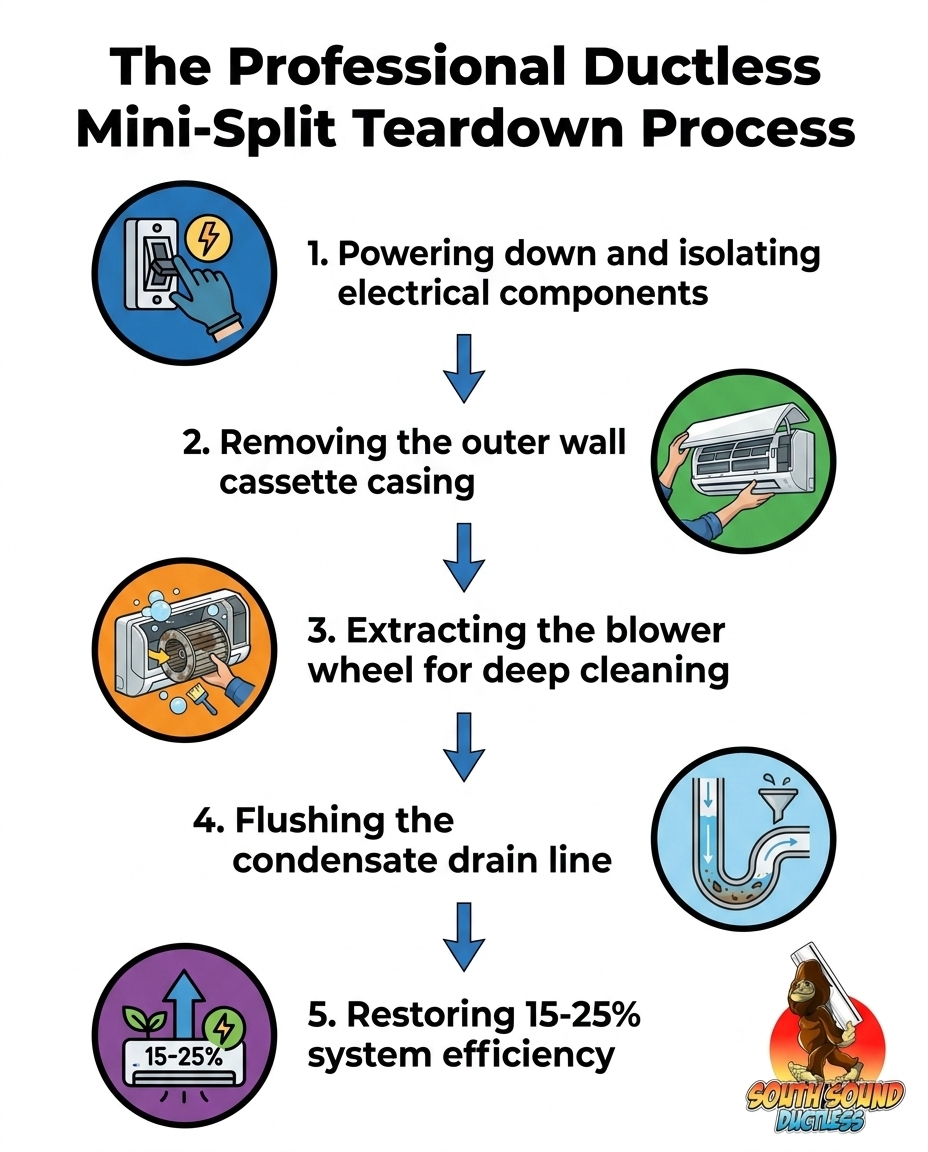
The efficiency impact: According to the U.S. Department of Energy, mold and dust buildup on a blower wheel can reduce your HVAC system's efficiency by 15% to 25% due to severely restricted airflow. Your system runs longer, consumes more electricity, and struggles to maintain the set temperature—all while blowing mold spores into your living space.
The Environmental Protection Agency (EPA) explicitly advises that when visible mold is present on the hard surfaces of your HVAC system, professional cleaning is necessary. This is especially true when comparing central AC and ductless mini-splits, as ductless units house the blower motor directly inside the living space rather than in a remote attic or basement.
• Homeowner Filter Wash — Target Area: Outer mesh screens — Mold Removal Effectiveness: None (does not reach internals) — Airflow Impact: Minor improvement
• DIY Exterior Wipe-Down — Target Area: Plastic outer casing — Mold Removal Effectiveness: Only removes visible surface dust — Airflow Impact: Zero impact on airflow
• Professional Teardown — Target Area: Blower wheel, coils, drain pan — Mold Removal Effectiveness: Complete eradication at the source — Airflow Impact: Restores 15-25% lost efficiency
Phase 1: Safe Power-Down and Outer Casing Teardown
Because accessing the blower wheel requires exposing high-voltage wiring and delicate sensors, this process is strictly handled by trained professionals. At South Sound Ductless, we believe in complete transparency. After countless deep cleans across Pierce County, we want you to know exactly what our technicians do when they arrive at your home. A proper deep clean requires a methodical teardown—not just a quick spray and wipe.
1. Electrical Isolation: The technician begins by shutting off the power at the main breaker panel and verifying that no voltage is flowing to the indoor unit. Ductless systems carry significant electrical loads, making this safety step non-negotiable.
2. Removing the Outer Casing: The front panel, filters, and directional louvers are carefully unclipped and removed. The main plastic housing is then unscrewed and lifted away from the wall bracket. This exposes the bare evaporator coil, the condensate drain pan, and the electrical control board.
3. Protecting the Electronics: Before any cleaning can begin, the technician must isolate the sensitive computer boards and temperature sensors. A specialized waterproof bib or heavy-duty masking is applied over the electrical housing on the right side of the unit to ensure zero moisture reaches the circuitry during the wash.
4. Dropping the Drain Pan: In many models, the condensate drain pan must be unclipped and lowered to provide clear access to the blower wheel behind it. This step requires specialized knowledge of the specific brand's engineering, as forcing the brittle plastic clips can snap them, leading to an immediate need for ductless repair.
This transparent, step-by-step teardown process proves our thoroughness compared to quick surface wipes. By fully disassembling the unit, our technicians ensure they can see and access every square inch of the contaminated area.
Phase 2: Extracting and Deep-Cleaning the Blower Wheel
Once the internal components are exposed and the electronics are protected, our technicians focus on the core of the problem: the blower wheel. This is the most labor-intensive and critical phase of the service.
The extraction process: Depending on the specific make and model of your system, the technician will either physically extract the blower wheel from the wall cassette or use a specialized, wall-mounted pressure-washing bib kit to clean it in place. If the wheel is extracted, the technician will carefully loosen the set screw holding the fan to the motor shaft, lift the evaporator coil slightly, and slide the cylindrical fan out of the housing.
Eradicating the biological growth: The wheel is then subjected to a rigorous deep clean. Technicians use professional-grade, specialized cleaning solutions designed to break down heavy biological growth without corroding the delicate plastic or metal fins. The wheel is thoroughly scrubbed and rinsed until the water runs completely clear and every trace of mold and sludge is gone.
Our team strongly recommends this thorough extraction and physical washing method over the ineffective practice of spraying "no-rinse" coil cleaners blindly into the unit. Blind spraying merely wets the dirt, turning it into a heavy mud that throws the fan off balance and creates even more strain on the motor. Our deep-seated mold removal goes beyond surface cleaning to actively restore the system's ability to move air efficiently, eliminating the musty odors at their source.
Phase 3: Flushing the Condensate Line and Reassembly
With the blower wheel restored to factory-clean condition, the technician moves on to the final stages of the teardown service. This phase ensures that the moisture your system pulls from the summer air has a clear path to exit your home.
1. Flushing the Condensate Drain Line: The drain pan and the attached condensate line are notorious for harboring algae and bacterial slime. The technician will flush the entire length of the drain line using specialized vacuums or pressurized air. Catching drainage issues early prevents unexpected water leaks from ruining your drywall during heavy summer usage.
2. Precision Reassembly: Once all components are clean and dry, the technician carefully reassembles the unit. The blower wheel is realigned and secured to the motor shaft, the drain pan is clipped back into place, and the protective waterproof bibs are removed. The outer casing and louvers are reattached with care to ensure no plastic tabs are stressed.
3. System Calibration and Testing: The power is restored at the breaker, and the system is turned on. The technician tests the unit through its active modes—cooling, dehumidification (dry mode), and fan-only. They will verify that the airflow is strong, the temperature drop across the coil is correct, and the musty odor has been completely eliminated.
Because the ambient humidity in the Pacific Northwest is so high, we find that proper condensate drainage is critical for preventing future moisture issues. A clear drain line ensures that the water your system extracts from the air flows outside immediately, rather than pooling inside the cassette and starting the mold cycle all over again.
Long-Term Benefits of a Professional Teardown
Investing in a professional deep cleaning does much more than just make your living room smell better. It fundamentally resets the health and performance of your HVAC equipment.
• Restored Indoor Air Quality: By physically removing the mold and bacteria from the blower wheel and drain pan, you stop the system from distributing airborne spores throughout your home. This is particularly beneficial for households with allergy or asthma sufferers.
• Lower Energy Consumption: When the blower wheel is choked with dirt, the fan motor has to draw more electricity to spin, and the compressor has to run longer to satisfy the thermostat. A clean wheel pushes air effortlessly, relieving the strain on the entire system and helping keep your summer energy bills in check.
• Extended Equipment Lifespan: Heat and friction are the enemies of any mechanical system. By removing the heavy sludge that throws the fan off balance and forces the unit to overwork, you significantly reduce the wear and tear on the blower motor and compressor.
While you should wash your reusable filters every few weeks, we tell our customers that a professional deep cleaning is typically recommended every one to two years, depending on your usage. Staying on top of this schedule, alongside regular ductless maintenance in Puyallup, ensures your system runs reliably for its full intended lifespan.
Frequently Asked Questions About Mini-Split Cleaning
Can I clean the inside of my mini-split myself?
Homeowners should absolutely clean the reusable air filters and gently wipe down the plastic outer casing to remove surface dust. However, internal components like the blower wheel, evaporator coil, and electrical boards require a professional teardown. Attempting to disassemble the unit yourself exposes you to high-voltage electrical hazards and greatly increases the risk of snapping brittle plastic clips or damaging sensitive temperature sensors, which voids warranties and leads to expensive repairs.
How do professionals clean a mini-split blower wheel?
Professionals begin by safely powering down the unit and removing the outer casing to expose the internal mechanics. They protect the computer boards with waterproof barriers and physically extract the blower wheel from the wall cassette. The wheel is then deep-cleaned outside the unit using specialized, non-corrosive solutions to remove all heavy mold, sludge, and debris before being carefully reassembled and rebalanced.
What happens if you don't clean your mini-split?
Ignoring deep maintenance inevitably leads to severe mold growth, strong musty odors, and dangerously restricted airflow. As sludge builds up on the blower wheel, the system's efficiency can drop by up to 25%, causing it to run continuously without properly cooling the room. This constant overworking increases your monthly energy costs and puts massive, premature strain on the outdoor compressor, leading to early system failure.
How often does a ductless system need a deep cleaning?
A professional deep cleaning is typically recommended every one to two years for most residential systems. However, homes located in humid climates, households with multiple pets, or those running their systems continuously during the peak summer months may require annual deep cleaning. Regular inspections will help determine how quickly biological growth is accumulating in your specific environment.
Will cleaning my mini-split remove the musty smell?
Yes, a proper professional teardown will completely eliminate the source of the odor. The musty smell is caused by active biological growth and stagnant water trapped inside the machine. By physically removing the mold from the blower wheel and thoroughly flushing the condensate drain line to clear out algae, a professional cleaning eradicates the bacteria causing the smell, leaving your air fresh and clean.
Restore Your Indoor Air Quality with Expert Teardown Services
Dealing with a foul-smelling air conditioner can be frustrating, but the problem is entirely solvable with the right professional approach. You do not have to settle for poor airflow or compromised indoor air quality. By addressing the root cause of the mold buildup with a comprehensive teardown, you can restore your system to peak cooling performance.
We highly recommend scheduling an inspection and deep cleaning before the peak summer heat demands maximum cooling from your equipment. Ensure your home stays comfortable, efficient, and healthy all season long. Schedule your ductless maintenance in Tacoma today to speak with our local experts at South Sound Ductless and get your system back on track.
"The DIY ductless installation was straightforward and saved us a lot of money! I highly recommend South Sound Ductless for their excellent support and quality products."


"Our new ductless system has transformed our home’s comfort level. The team at South Sound Ductless was professional and knowledgeable throughout the process!"
Get Your Comfort Today!
Contact us for expert HVAC solutions and consultations.
Stay Updated with Our Newsletter
Subscribe for expert HVAC tips, the latest updates, and exclusive promotions delivered right to your inbox.

FAQs
Here are some common questions about our HVAC services and ductless systems.
Ductless heating uses a system of indoor and outdoor units to provide efficient heating. These systems are ideal for homes without existing ductwork. They offer flexibility and can be controlled room by room.
Our DIY ductless program simplifies installation with pre-charged kits. You can easily mount the indoor unit, connect refrigerant lines, and set up the outdoor condenser. It's designed for quick and efficient setup.
Ductless systems provide energy efficiency, reducing utility bills while maintaining comfort. They improve indoor air quality and allow for customizable temperature control. Additionally, they take up less space than traditional systems.
Yes, we offer financing through Enhancify to make your HVAC investments more manageable. This allows you to enjoy comfort without the immediate financial burden. Explore our options to find a plan that suits you.
Regular maintenance is key to keeping your ductless system running efficiently. Schedule annual tune-ups and clean the filters regularly. This ensures optimal performance and prolongs the life of your system.
Still have questions?
We're here to help!